Nothing beats the smell of a fresh espresso shot pulled in your own kitchen. It’s rich, bold, and carries that same café magic without the café price tag.
Sure, espresso has a reputation for being fussy and complicated. All the talk about grind size, tamping, and extraction times can make your head spin faster than a barista’s milk frother.
But here’s the truth: with a few simple tools and a bit of practice, anyone can master it.
By the time you finish this guide, you’ll be ready to craft shots that rival your favorite coffee shop, without leaving home!
What is Espresso, Really?
Espresso isn’t a special bean or secret roast, but it’s a brewing method built on precision and pressure.
Instead of hot water slowly dripping through grounds like in a coffee pot, espresso forces near-boiling water through a compact puck of finely ground coffee at high pressure, usually around nine bars.
That force extracts intense flavor in just 25–30 seconds, creating a concentrated shot with layers that drip coffee can’t match.
Unlike a French press, which steeps grounds in water and yields a heavier, sometimes gritty cup, espresso delivers clarity, power, and balance in a compact package.
Its hallmarks are unmistakable: a thick body, bold taste, and that caramel-colored crema floating on top like a golden crown.
The crema isn’t just pretty—it signals proper extraction and adds a velvety texture to every sip.
In short, espresso is coffee distilled to its essence: small in volume, big in character!
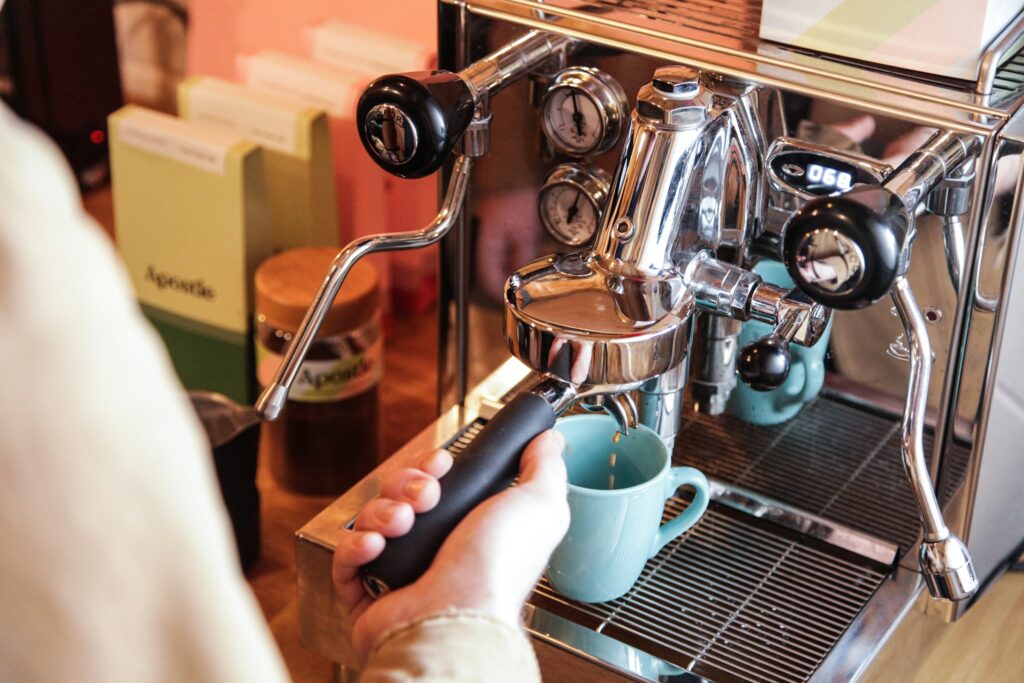
1. Setting Up: Gear for Beginners
Espresso Machine Options: Entry-Level vs Mid-Range
If you’re just dipping your toes into espresso, start simple. Entry-level machines are affordable, compact, and beginner-friendly.
They won’t have all the bells and whistles, but they’ll pull a decent shot and give you space to practice.
Mid-range machines, on the other hand, bring more consistency, better temperature control, and stronger steam wands for milk.
They cost more, but they’re sturdier and let you grow into the craft without needing an upgrade too soon.
Alternatives: Moka Pot, Aeropress Hacks, Capsule Machines
Not ready to commit to a machine? No problem. A moka pot is the closest cousin to espresso—cheap, durable, and it brews strong coffee on your stovetop.
It won’t hit true espresso pressure, but it gets you that concentrated punch.
Aeropress fans can pull off “pseudo-espresso” by using fine grinds and pressing with extra force, which is surprisingly tasty in lattes.
Capsule machines, like Nespresso, are the ultimate convenience option: pop in a pod, press a button, and you’re sipping in seconds.
Purists might roll their eyes, but honestly, it beats a watery drip cup when you’re short on time.
Must-Have Accessories: Tamper, Grinder, Scale, Frothing Pitcher
Good accessories make or break your espresso journey. A tamper is non-negotiable because it compresses the coffee evenly, ensuring water flows properly through the puck.
A burr grinder is even more critical; espresso demands consistency, and blade grinders just don’t cut it (pun intended).
A scale keeps you honest with dosing, because “eyeballing” usually leads to sour or bitter shots.
And if milk drinks are your goal, a frothing pitcher is your sidekick. Its shape makes swirling milk easy, and without it, latte art is basically a lost cause.
Nice-to-Haves: Knock Box, Thermometer, Distribution Tool
These extras aren’t essential, but they sure make life smoother.
A knock box gives you a clean way to empty used coffee pucks, which is way better than slamming your portafilter into the trash can and wearing half the grounds on your shirt.
A thermometer helps beginners steam milk to that sweet spot around 150°F, since overheated milk tastes flat and sad.
A distribution tool levels your grounds before tamping, making shots more consistent.
These are the “power steering” of espresso gear: not required, but once you use them, you’ll wonder how you ever managed without.
2. Dialing In the Shot
The Ratio: 1:2 Rule
Espresso is a game of precision, and the easiest starting point is the 1:2 ratio. That means for every gram of coffee you put in, you aim for about double that in liquid espresso out.
For example, 18 grams of finely ground coffee should yield roughly 36 grams of espresso.
This ratio isn’t a rigid law but a reliable compass because it gives your shot balance, body, and sweetness without being too weak or too harsh.
Think of it as the “recipe card” you follow before you start improvising.
Shot Timing Basics: ~25–30 Seconds
Timing is your next anchor. Most espresso shots fall in the 25–30 second window from the moment you hit the brew button. Pulling a shot too quickly gives you a thin, sour taste.
Letting it run too long makes it bitter and hollow. Use a timer or the stopwatch on your phone to track every shot in the beginning.
Over time, you’ll develop an instinct for when a shot “looks right,” but until then, the clock keeps you honest.
Taste Test Method: Sour = Under-Extracted, Bitter = Over-Extracted
Your taste buds are the ultimate diagnostic tool. If your espresso tastes sour or sharp, it’s under-extracted—water zipped through too fast and didn’t grab enough flavor.
If it’s bitter or harsh, it’s over-extracted—water hung around too long and pulled out unwanted compounds. When it tastes balanced—rich, sweet, and smooth—you’ve nailed it.
Don’t be afraid to sip and analyze like a mini coffee detective. Each shot is feedback, not failure.
Simple Adjustments: Grind Size, Dose, Tamp
Small tweaks fix most issues. If your shot is running too fast and tasting sour, make your grind finer. If it’s crawling out like molasses and tasting bitter, go coarser.
Adjust your dose too—more coffee slows down the shot, less speeds it up. Finally, check your tamp.
Uneven or weak tamping can cause water to channel through one side, ruining even a perfect grind.
3. Milk Frothing Made Easy
Types of Milk: Dairy vs Plant-Based
Milk choice makes a big difference in both taste and texture. Whole dairy milk is the classic because it froths beautifully thanks to its fat and protein, giving you that silky microfoam every barista swears by.
Skim milk will foam higher but feel lighter, almost bubbly, which works if you like airy cappuccinos.
Plant-based milks are trickier but not impossible. Oat milk is the champion here because it steams smoothly and has a naturally sweet flavor that plays nicely with espresso.
Almond and soy can work too, but they sometimes split or taste a little off if overheated. The secret is buying “barista” versions when possible because they’re designed to hold foam like champs.
Frothing Tips with a Steam Wand
If your machine has a steam wand, you’re holding the key to café-quality lattes. Start by purging the wand (quick blast of steam) to clear out condensation.
Keep the tip just below the milk’s surface so it can introduce air without screeching like a broken whistle.
Once you hear a gentle “tss-tss,” lower the jug slightly to stretch the milk, then bury the wand deeper to heat evenly. Aim for around 150°F—hot but not scalding.
If you don’t have a thermometer, stop when the pitcher is too warm to hold comfortably for more than a second or two. Smooth, velvety foam is your end goal, not giant bubbles.
No-Wand Methods: French Press Pump, Handheld Frother, Mason Jar Trick
No steam wand? No problem. A French press makes an excellent frother—just warm your milk and pump the plunger up and down until it thickens.
A handheld electric frother is cheap, portable, and turns warm milk creamy in seconds.
For the absolute low-tech route, use a mason jar: pour in hot milk, screw on the lid, and shake like you’re making a cocktail. It won’t be as silky as a steam wand, but it works in a pinch.
Latte Art for Beginners: Hearts Start with Blobs!
Latte art looks intimidating, but the truth is, most people start with what can only be described as milk blobs. That’s okay.
Focus first on getting consistent microfoam because good texture matters more than drawing perfect leaves.
When you’re ready, pour low and steady into the center of the cup, then wiggle the jug slightly to create a round shape. Pull the pour through the middle to turn that blob into a heart.
It might look more like an amoeba than a heart at first, but practice turns the blobs into patterns. Remember, the goal isn’t to impress Instagram, but it’s to make a drink that tastes as good as it looks.
Common Beginner Mistakes (and Fixes)
Using Pre-Ground Coffee
Pre-ground coffee might feel convenient, but it’s the fast track to flat, lifeless espresso.
The moment beans are ground, they start losing flavor, and by the time they hit your portafilter, most of the magic is gone. Fresh grinding is the fix.
Even a basic burr grinder will keep your shots lively and aromatic.
Think of it like slicing fruit—you wouldn’t cut an apple days in advance and expect it to taste crisp.
Ignoring Machine Cleaning
Espresso machines may look tough, but they’re sensitive beasts. Skip cleaning and you’ll end up with bitter flavors, clogged parts, and a shorter machine lifespan.
Oils from coffee build up quickly, and old milk residue can turn rancid in no time.
The fix is simple: backflush your machine regularly, wipe the steam wand after every use, and give it a deeper clean every couple of weeks.
Over-Tamping or Uneven Tamp
Tamping is about consistency, not brute strength. Press too hard and you choke the water flow, making shots painfully slow and over-extracted.
Tamp unevenly and water channels through the weak spots, leaving you with a sour mess.
The sweet spot is a firm, level press that creates a smooth puck.
Forgetting to Purge the Steam Wand
One rookie mistake is jumping straight into frothing milk without clearing the wand.
The result? A spray of condensation or stale milk splattering into your pitcher. It’s like turning on a garden hose without checking if it’s full of old water.
The fix: a quick purge before and after steaming. It takes two seconds and keeps your milk clean, your wand unclogged, and your coffee tasting fresh.
Expecting Perfection on the First Try
Espresso is humbling. Your first shot might taste sour, bitter, or like liquid regret. That’s normal. The mistake isn’t in the bad shot, but it’s in expecting to nail it immediately.
Even seasoned baristas pull duds. The fix is patience and practice. Each shot teaches you something about grind, tamp, or timing.
Celebrate the progress, laugh at the flops, and remember: every “bad” espresso still beats no espresso at all.
Building Confidence Through Practice
Why Repetition Is Key
Espresso isn’t mastered in a weekend—it’s learned through repetition. Every shot you pull is practice, and every practice teaches you something new.
Muscle memory develops when you grind, tamp, and brew over and over again. It’s the same as learning guitar chords or perfecting a pancake flip: the more you do it, the smoother it feels.
Repetition builds confidence because you start seeing patterns, and those patterns lead to consistency.
Keeping a “Shot Log” for Grind/Timing Notes
A simple notebook or even your phone’s notes app can become your secret weapon. Write down how many grams of coffee you used, the grind setting, the time it took, and how it tasted.
Over time, you’ll spot trends that help you troubleshoot faster. If one day’s espresso was sour and you logged a 20-second shot, you’ll know you need a finer grind next time.
Experimenting with Beans and Milk Styles
Don’t stick with one bean or one type of milk forever. Different beans bring out different flavors—some are chocolatey, others fruity, and a few can taste like toasted nuts.
Trying new roasts is like traveling the world without leaving your kitchen. The same goes for milk. Whole milk makes creamy lattes, oat milk brings sweetness, and almond milk gives a nutty twist.
Swapping ingredients keeps things exciting and teaches you how flexible espresso can be.
Setting Realistic Expectations: “Better Than Café” Comes with Practice
Your first few drinks might not match your favorite café’s masterpiece, and that’s okay. Baristas spend months, sometimes years, training to get that kind of precision.
The good news? With steady practice, you’ll get to the point where your home shots rival or even beat what you buy outside. It’s not about perfection; it’s about progress.
Each slightly better shot is a win, and one day you’ll sip your own espresso and realize you don’t miss the café at all!
Final Words
Espresso at home isn’t rocket science—it’s practice, patience, and the right setup. With good beans, the right gear, and a little persistence, you can craft café-quality shots in your own kitchen.
Don’t let a sour or bitter cup discourage you. Every “bad” shot is just another step toward mastering the craft. Even pros pull duds now and then.
So fire up your machine, grind some beans, and pull a shot today. Sip, learn, adjust, and enjoy the journey as much as the coffee!
FAQs
Do I Need an Expensive Machine to Make Good Espresso?
Not at all. While high-end machines give you more control and consistency, plenty of beginners start with budget-friendly models and still brew great shots.
Technique and fresh beans matter more than the price tag.
Can I Use Regular Coffee Beans for Espresso?
Yes, you don’t need special “espresso beans.” Any fresh, high-quality coffee can work.
Darker roasts are common because they taste bold and rich, but lighter roasts can highlight fruity or nutty notes if that’s your style.
How Fine Should My Grind Be?
Espresso needs a grind finer than table salt but not as powdery as flour. Too coarse and water zips through too fast. Too fine and your machine chokes.
A burr grinder helps you find that sweet spot with more accuracy.
How Often Should I Descale/Clean My Machine?
Daily, give it a quick wipe and flush to keep oils and milk from building up.
A deeper clean and descale should be done every one to three months, depending on water hardness and how often you brew.
What’s the Easiest Espresso-Based Drink to Start With?
A simple latte is the perfect entry point. One shot of espresso, steamed milk, and a touch of foam—it’s forgiving, delicious, and doesn’t require advanced latte art skills.
Plus, it feels like café luxury without the complicated steps.
Hi, I’m Selene Veyra! I’m the coffee-loving creator of Brewed Moments. My passion for coffee began in my grandmother’s kitchen, where her morning brew sparked a lifelong love for the beverage. Now I test brewing methods, gear, and homemade café-style recipes to make great coffee simple for everyone ☕


